Archives June 2025

featured image for guide to starting your own podcast

A Step-by-Step Guide to Starting Your Own Podcast

Starting your own podcast is a fun and productive way to expose yourself to new information, disseminate information that you think is valuable to a receptive audience, and have fun building a community and meeting new people. It is no wonder that the activity has become so popular. Below, we have a full guide to starting your own podcast.

Contributing to this growing popularity is the fact that you do not need much technical expertise or equipment to get your own podcast going. It is quite easy to assemble the equipment and audio cables you might need, as well as learn the basics surrounding the practice.

If you are interested in getting started with this, check out this step-by-step guide to starting your own podcast.

Why Start a Podcast?

Starting a podcast can be a great way to promote yourself, interact with individuals who are like-minded, and expose yourself to new ideas. The practice carries innumerable benefits in terms of expanding your knowledge and network.

A Step-by-Step Guide to Starting Your Own Podcast

Starting a podcast is not particularly difficult or prohibitive. However, it does take some amount of effort and planning to execute if you are trying to offer your listeners a quality experience. Some of the steps below have proven useful for individuals making the attempt.

Plan Your Show

One of the first steps in your podcast experience should be planning and outlining your show. Making sure you can set aside the time necessary to produce your show and plan quality content can help ensure that your podcast attracts and keeps an audience. Even just sketching a brief outline can be an effective way to jumpstart this process.

Choose a Concept

Another one of the initial steps in creating a podcast is creating a concept for your show and the types of topics that you will choose to focus on while you explore that concept. Creating a concept prior to trying to execute episodes or invite guests can help lend your efforts a sense of focus and quality.

Consider a Co-Host

Having two hosts for a podcast is a proven formula that can help your episodes automatically seem more fun and social. Part of this is because with a co-host, you can always ensure that there is a sense of conversation and conviviality to your show, even when the show is just beginning.

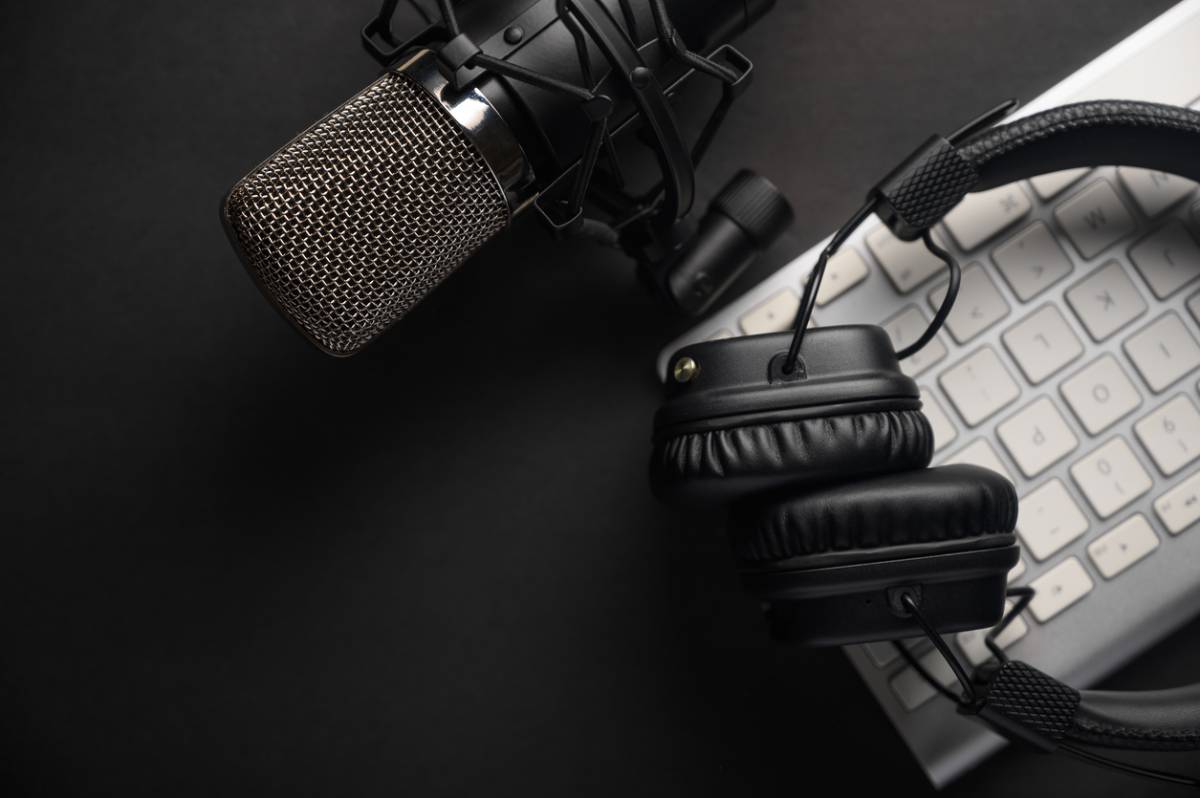
Assemble Your Equipment

It does not take an extraordinarily high amount of equipment to start a podcast. However, making sure that you have a few essentials can help you certify that you will enjoy a high or at least acceptable production value for your show. Doing some shopping around for the microphone, computer, and audio editing software you might need to make a great show will be more than worth it. 

Start Recording

To have a successful podcast, you are going to need to have some content. And to produce content, you will have to just start recording. Once you have your co-host, concept, and more, oftentimes, the most effective way to produce content is to just start recording. This way, you can assemble high amounts of raw content that you can then edit into a cohesive episode later. Even when you are just beginning, simply getting into the practice of recording can help you hone your chops at being a successful podcast host.

Learn Some of the Basics of Audio Editing

There are some basic skills that come with audio editing and production that will serve the would-be podcaster well in their quest to produce great content. Taking some time prior to actually creating episodes can help save you even more time later when it comes down to editing the content that you produce. Things like choosing a theme song and mixing the speech of yourself and your guests become much easier when you have some of the basics behind mixing audio down.

Pick a Web Host

Another essential step towards starting a podcast is selecting a web host that will fit your data needs. Fortunately, there are a number of web hosts that have made hosting podcasts their niche, meaning that nowadays it is quite easy to find a host that is perfectly suited for hosting the sometimes large amounts of data required to properly host a podcast.


Your Friend in Audiovisual

Calmont is one of the most trusted resources for audio and visual equipment needs and general custom wires and cables. If you are interested in discussing your plans to start a podcast with an esteemed professional, contact us today to hold an appointment and check out our selection of audiovisual equipment. 

Featured image for How to Choose Montessori Tools

How to Choose Montessori Toys

How to choose Montessori toys is one of the most common questions parents ask when they first start exploring a Montessori education. After all, toys are so much more than just a way to keep children entertained. They’re also a key tool for development, and with that in mind, they need to be carefully chosen to align with how children naturally learn: through movement, exploration, and hands-on experience. 

Whether you’re building a home environment that supports Montessori principles or simply want toys that do more than flash and beep, understanding how to select them can make all the difference in your child’s growth. Let’s dive right in so you can start picking Montessori-style toys with confidence. 

How to Choose Montessori Toys Based on Core Montessori Principles

Montessori toys differ from mainstream options in a few key ways. They are designed to be simple, purposeful, and rooted in reality. When choosing Montessori toys, look for items that are made of natural materials, isolate one skill at a time, and encourage independence.

You want toys that are beautiful but not overwhelming and ideally made of wood, metal, or fabric instead of plastic. They should teach cause and effect, invite repetition, and help develop concentration. Rather than overstimulating a child with flashing lights or loud sounds, Montessori toys allow the child to engage more deeply and meaningfully. This approach is woven into every element of Montessori education and should benefit the child on their learning journey.

Age-Appropriate Choices for Montessori-Aligned Toys

Choosing the right toy also means selecting one that suits your child’s age and developmental stage. In Montessori, this concept is known as “following the child,” or meeting children where they are to support their natural growth.

For infants, this might mean black-and-white visual mobiles or grasping toys that help build coordination. Toddlers benefit from toys such as stackers, shape sorters, and simple puzzles that promote fine motor skills and problem-solving abilities. As children grow older, toys can introduce early math, literacy, and practical life skills, such as pouring water, slicing wooden fruit, or using a screwdriver set.

These seemingly simple activities foster independence, confidence, and focus. They also mirror the kinds of hands-on learning that children experience daily in Montessori school environments.

Look for Toys That Promote Independence and Purpose

A foundational principle of Montessori education is helping children do things for themselves. This value should be reflected in the toys you choose.

Montessori toys should encourage your child to explore and complete an activity without needing constant adult intervention. That’s why you’ll often see toys that have a clear beginning, middle, and end. For example, a set of nesting cups or a ring stacker provides your child with a clear goal: to sort, arrange, or complete the set. There’s a natural reward in finishing the task, and no need for flashing lights or congratulatory sounds.

Avoid Overly-Themed or Passive Entertainment Toys

One of the easiest ways to spot a non-Montessori toy? It’s probably based on a popular cartoon, requires batteries, or does all the playing for your child.

While these kinds of toys may be fun in small doses, they don’t support the kind of deep, self-directed learning Montessori emphasizes. Characters and fantasy elements can sometimes distract from the real-world learning that helps children understand and relate to their surroundings.

Instead, choose toys that reflect reality, like miniature kitchen tools, realistic animal figurines, or child-sized cleaning sets. These allow children to mimic adult behavior in a safe and developmentally appropriate way.

Simplicity and Focus: Less Is More

A cluttered playroom filled with dozens of toys can be overwhelming for children. Montessori encourages minimalism, where fewer, better-selected toys allow for deeper concentration and longer playtime.

Maintain a rotation system by offering a limited number of toys at a time and switching them out periodically to keep interest high. Look for toys that isolate one concept, such as a puzzle that teaches matching or a set of beads for counting. Simplicity helps children stay focused and increases the likelihood of mastering each new skill before moving on to the next one.

This approach mirrors the structured yet flexible learning environment found in high-quality Montessori school programs, where materials are curated to support purposeful engagement.

The Role of Practical Life Toys in Learning

Some of the most powerful Montessori toys don’t resemble toys at all—they look like real tools. This is by design.

Practical life toys enable children to safely and developmentally supportively mimic adult tasks. Think of pouring pitchers, sweeping sets, or small gardening tools. These toys help children develop muscle memory, improve hand-eye coordination, and build confidence. Most importantly, they make children feel capable, which is one of the central goals of Montessori education.

By giving your child the tools to take care of themselves and their space, you’re helping them grow into independent, responsible individuals.

Take the Next Step Toward a Thoughtful Montessori Experience

Ready to learn more about how Montessori can enrich your child’s growth? Contact Future Minds Montessori to explore our school programs or schedule a tour today.

featured image for article on how to reupholster an ottoman

How to Reupholster an Ottoman

Even the sturdiest and most reliable ottomans can begin to show signs of wear after years of use. The good news is that reupholstering an ottoman is a manageable project, especially for people with no prior experience. In this article, we discuss how to reupholster an ottoman and walk you through all the steps of the process.

How to Reupholster an Ottoman

One way to reupholster your ottoman is to trust professionals with this job. For this, you will need to find a reliable studio or an individual master who works with furniture restoration, choose the reupholstery fabric, and pick up your ottoman when it is ready.

Having a professional restore your furniture can save you time and effort, but it will be more expensive than doing it yourself. Ottoman reupholstery can be a fun, rewarding, and relatively uncomplicated project if you have never done reupholstery before. Here are the steps we recommend taking when reupholstering your ottoman:

Prepare the Right Tools

Tools that you will need for your ottoman reupholstery project include:

  • A heavy-duty staple gun
  • A staple removal or a flathead screwdriver
  • Pliers
  • Scissors
  • Measuring tape or a long ruler 
  • Chalk for fabric marking
  • Screwdriver if your ottoman has legs that will need to be reattached
  • A sewing machine can be needed for some projects that require sewing cushion covers or piping

Start by Removing the Old Upholstery

We recommend starting with this step because it allows you to measure the old fabric and use the measurements when purchasing new fabric. To remove the old upholstery, follow these steps:

  • Snip the thread that holds the fabric. If the fabric is attached to the ottoman by staples, use a special staple remover or a flat screwdriver. If staples break off during the process, use pliers to remove the remaining parts.
  • Once nothing holds the fabric in place, you can peel it off. However, try not to displace the padding underneath it if possible.
  • Mark all the pieces of the fabric to remember what part of the ottoman they belong to.

Replace the Padding if Necessary

If the padding in your ottoman is uneven or gets damaged or displaced when you take off the old upholstery, consider replacing it with new foam padding or smoothing it out by adding new batting on top of the existing padding. Make sure to take the thickness of the new padding into account when buying and cutting your new fabric.

Prepare the New Fabric

  • Carefully measure the old fabric and add several extra inches to each measurement. If you are a complete beginner, consider purchasing extra fabric to account for potential errors. 
  • Choose the new fabric. We recommend going for durable upholstery fabric. Please note that non-upholstery fabrics will wear out very quickly. Generally, the most durable fabrics are heavy-duty vinyl, polyester, and nylon. Also, some sellers offer upholstery fabric called performance fabric. Leather is a durable option, too, but this material requires special tools and will likely be very challenging to work with for a beginner without specialized training.
  • Once you have your new fabric, transfer the measurements onto it, using a ruler and chalk for fabric marking. Use old fabric as a guide. Once you are certain that all measurements are accurate and you have accounted for folds, wrapping, and attachment, cut the fabric.

Attach the New Fabric to Your Ottoman

To attach the new fabric to your ottoman, start with the top and then reupholster the sides of the ottoman. Make sure that the fabric fits tightly on every side of your ottoman when attaching. Also, make neat corners by securing the folds with staples. We recommend using a staple gun to attach the fabric to your ottoman, as it is one of the most beginner-friendly tools.

Add the Finishing Touches

Once the main part of the reupholstery project is complete, carefully trim away the excess fabric on the bottom of your ottoman and reattach the legs or hardware (make sure everything is attached securely.) You can also add decorative elements to your ottoman, such as piping, decorative buttons, or nailhead trim.

Get a Beautiful New Ottoman at A. Rudin

Reupholstering your ottoman can be a satisfying project and a great way to add a personal touch to your favorite piece of furniture. However, a reupholstering project requires time, patience, and the right tools. If you’re short on time and need a new ottoman, do not hesitate to explore our beautiful and high-quality luxury furniture collections on our website. 

featured image for are rooler skates allowed at skatepartks article

Are Roller Skates Allowed at Skateparks?

If you are considering starting rollerskating or switching from flat surfaces to a more challenging environment, you might be interested in going to a skatepark. But are roller skates allowed at skateparks? Please read our article to find out.

Are Roller Skates Allowed at Skateparks?

Skateparks are designed for wheel-based sports and are typically equipped with smooth surfaces, bowls, rails, and ramps. Often, skateparks are associated with skateboards and BMX bikes. However, as roller skating is gaining more and more popularity, a growing number of roller skaters appear in skateparks. 

Although, in general, roller skaters are welcome at skateparks, we recommend considering such factors as the rules and culture of the park you want to visit and personal safety. Let us look at these points in more detail.

Acceptance of Roller Skates in Skateparks

In general, most skateparks do not restrict visitors based on the type of equipment they use, meaning that regardless of whether you ride a skateboard, BMX, scooter, inline skates, or quad roller skates, you are typically free to use the space. 

Check the Rules of the Skatepark First 

Skateparks can have their own rules. These rules are typically posted at the entrance of the park. Some skateparks also have websites where you can check the rules and restrictions. Alternatively, you can try contacting the local parks and recreation department.

The rules might regard allowed equipment, specific attendant groups and time of their attendance, the number of people allowed to attend at any given time, or the residency of the attendants. Additionally, check the rules of the park for safety requirements (for example, many parks require wearing a helmet) and specific restrictions. 

Consider and Respect Skatepark Etiquette and Community

Nowadays, many skateparks have inclusive, diverse, and supportive communities. To enjoy being a part of such a community and to help it grow and improve, we recommend considering and respecting the existing etiquette of the skatepark you are going to attend, as well as several general rules of thumb:

  • Take turns using skatepark equipment, and do not try to cut in front of other people who are waiting for their turn. Not only is it disrespectful, but it is also highly unsafe.
  • Be aware of your surroundings and other people in the park, particularly of the flow of movement. Move in the same direction as other skaters to avoid creating collisions and hurting yourself and others.
  • Do not hesitate to communicate with others. Even a simple nod or eye contact can be sufficient to signal that you are going in a specific direction or planning to use certain equipment or features.
  • Never leave your gear, bags, or other things lying around and creating a hazardous environment for other people in the park. 
  • Respect people around you and be friendly, as skateparks are shared public spaces. This way, you will contribute to building a strong local community and make new friends as well. Also, do not hesitate to help others if they need it. 

Tips for Roller Skating at a Skatepark

We recommend following several simple rules to enjoy your experience to the maximum staying safe at the same time:

  • Start by practicing on quarter pipes and small ramps before challenging bigger options or bowls.
  • Remember that a lot of people in skateparks perform tricks or move at high speed. So, be prepared to pay attention to your surroundings and put safety first.
  • Always wear your safety gear, which should include a helmet, knee pads, elbow pads, and wrist guards, as breaking a bone is painful and will prevent you from skating for weeks or even months.
  • Consider taking a class for beginner roller skaters. In fact, many skate communities offer such classes to teach beginners how to navigate a skatepark and stay safe.
  • Learn and practice falling safely and getting up quickly to avoid collisions with other skatepark users. Rules for safe falling include falling on your pads on your knees and elbows and tucking in your arms to avoid wrist injuries.
  • Bring a friend to skate together, especially if you feel shy about being in a new environment.

Get Your New Gear at Crazy Skates

Most skateparks offer a supportive environment and fun experience for both new and experienced skaters as long as you respect the rules of the park and its community. However, to enjoy your experience, you also need reliable, good-quality gear. If you are considering upgrading your equipment or buying your first set, explore options at our skate shop. Crazy Skates offers everything you need to skate safely and confidently.

featured image for article how to use text message automations in billing and finance

How to Use Text Message Automation in Billing and Finances

In today’s digital landscape, businesses are continually seeking ways to streamline their operations and enhance their communication with customers and the target market. One of the most powerful yet underutilized tools in billing and finance is text message automation. Text messages are instantly delivered and have high open rates. This enables SMS automation to offer convenient, effective, and budget-friendly solutions for managing financial transactions, sending reminders, and enhancing customer engagement. Text message automation in billing and finance can benefit you whether you are a small business owner, a freelancer, or a part of a large organization. If you want to know how to use text message automation in billing and finances, here is your guide.

How to Use Text Message Automation in Billing and Finances

Automated Payment Reminders

Missed payments can be problematic and costly. To prevent any inconvenience, you can send timely automated payment reminders to your customers or clients before their due dates. Friendly reminders such as:

“Hi, Alex, your invoice #4522 for $200 is due on May 20. You can pay using this link: [payment link]. If payment has already been made, please disregard this message. Thank you.”

Sending automated payment reminders can dramatically reduce late payments and eliminate the need for awkward collection calls. Texts can be scheduled days or weeks in advance. Doing so will free up your schedule while ensuring regular communication with clients and customers.

Invoice and Receipt Notification

Remember the days when invoices were only sent by email or snail mail? They are gone. With text automation, businesses can send their customers brief notifications once an invoice has been generated or a payment has been received. 

Messages like the following can help build trust and create an organized and customer-focused image:

“Your payment of $200 has successfully been processed. Thank you for your business! – [Your Business Name]”

Real-Time Fraud Alerts and Account Notifications

Banks and other financial institutions frequently utilize SMS automation to safeguard their clients against fraud.

You can also do the same for your clients and customers by alerting them of:

  • Unusual account activity
  • Overdue balances
  • Failed payment attempts
  • Subscription renewals

These notifications can help your clients take immediate action to avoid bigger problems later on.

Streamlined Subscription Management

If you are a business offering subscription-based services, SMS automation can be a game-changer for you. You can notify your subscribers when their plan is due for renewal, give them options to update payment methods, or confirm successful renewals via text.

Two-Way Texting for Two-Way 

Some platforms allow two-way messaging, which enables customers to reply using simple inputs, such as “1” for “pay now,” “2” for “delay payment,” or “3” for “speak to a representative.” This will allow you to enhance customer satisfaction and reduce the need for manual follow-ups.

Integration with Accounting and CRM Software

Many platforms seamlessly integrate with tools such as QuickBooks, Zero, and Salesforce, among others. This means:

  • Invoices can trigger an automatic text reminder
  • A new client entry in your CRM can activate a welcome message and billing schedule
  • Past-due invoices can also trigger escalation messages after a specified number of days

This allows you to maintain regular communication with your clients without the need for extra admin work.

Financial Polling or Payment Schedule

If you want to know about how your clients feel about your billing or financial services, it is easy to get this information just by sending a message like:

“How easy was your last payment experience?

Reply “1” for easy

Reply “2” if difficult”

Legal and Compliance Considerations

Remember that there are local laws like the U.S., there is the TCPA or the Telephone Consumer Protection Act, which require consent before sending automated texts. You need to get opt-in permission, provide an easy way to opt-out and ensure customer data is securely stored.

Take Control of Your Billing and Finances Today

Text message automation is more than a communication tool. It boosts your financial efficiency through payment reminders, real-time alerts, or even automated receipts.

If you are not already using SMS automation in billing and finances, today is the time to start using text messaging for accounting.  Simplify your billing process, get paid faster, reduce late payments, and enhance client satisfaction without the stress of manual tasks. Call us today and discuss your goals and requirements with us.